▲ uMap 的網站長這個樣子,可以看到其他使用都製作的客製化地圖
首先我們先登入。
▲ uMap 提供第三方認證方式登入,可以用開放街圖、GitHub 等帳號登入
這裡我們選擇用開放街圖的帳號登入
▲ 出現認證畫面,按下確認就可以了
▲ 登入後就會導回首頁,按「建立地圖」按鈕
不過我們先選擇我們喜歡的底圖地圖,uMap 提供數十套基於開放街圖資料產生的地圖,可以當底圖使用。
▲ 底圖選擇的畫面,挑選你看得順眼的地圖
▲ 我們選擇 OSM Road 這套地圖,並且將畫面移動到臺灣一帶
我們先回到 OverPass Turbo 網站,搜尋全臺所有的百貨公司和購物中心。
▲ 用 OverPass Turbo 的精靈模式,搜尋全臺所有的百貨公司和購物中心,輸入 shop=department_store or shop=mall in "臺灣"
▲ OverPass Turbo 跑出來的結果,連金門的商場也找得到
接著我們要使用匯出工具,將 OverPass 查到的結果,與 uMap 連結。
▲ 匯出工具
▲ 請選擇檢索頁籤,點壓縮的 OverpassQL 格式
▲ 得到這樣一串連結,請將連結部分用選取的方式 [out:json][timeout:25];area(3600449220)->.searchArea;(node["shop"="department_store"](area.searchArea);way["shop"="department_store"](area.searchArea);relation["shop"="department_store"](area.searchArea);node["shop"="mall"](area.searchArea);way["shop"="mall"](area.searchArea);relation["shop"="mall"](area.searchArea););out body;>;out skel qt; 複製起來
將上面複製出來的字串,接在 http://overpass-api.de/api/interpreter?data= ,變成
http://overpass-api.de/api/interpreter?data=[out:json][timeout:25];area(3600449220)->.searchArea;(node["shop"="department_store"](area.searchArea);way["shop"="department_store"](area.searchArea);relation["shop"="department_store"](area.searchArea);node["shop"="mall"](area.searchArea);way["shop"="mall"](area.searchArea);relation["shop"="mall"](area.searchArea););out
body;>;out
將這段組合起來的連結整串複製,我們將把這整串貼到 uMap 裡面。
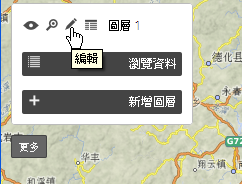
回到 uMap,到畫面左方的選項,點開後出現圖層,點選編輯按鍵。
▲ 編輯按鈕
▲ 選擇遠端資料,將其點開
▲ 將剛剛那一串網站,貼到網址欄位裡
▲ 勾選動態選項
▲ 另外選擇資料格式為osm
▲ 最後得到的地圖畫面
如果資料沒出現的話
有時候你依照上述步驟操作,完成後畫面仍然空無一物,而網頁仍然在跑,那表示 OverPass Turbo 與 uMap 之間出現問題。這時候只能先從 OverPass Turbo 把資料下載下來,再把資料匯入 uMap 裡。只是這麼做,並沒辦法時時保持這份地圖處在即時狀態,如果在 OSM 上有變動的話,並不會出現在 uMap 上。
▲進入匯出視窗,選擇 geoJSON 格式
▲ 回到 uMap上,選擇右側選擇,匯入功能,將剛下載的 geoJSON 檔上傳匯入
▲ 完成了!
▲ 在 uMap 上也可以改變圖示,圖為新竹市的公車站分佈圖


沒有留言:
張貼留言